Last Updated: 26 June 2026
All creatures follow the cycles of our earth; of day and night and the passing of the seasons and honeybees are no exception. They respond to the urgencies of this cycle by carrying out activities that guarantee their survival… Wintering bees in northern climates can be tough, but there are preparations you can make that will best ensure their survival.
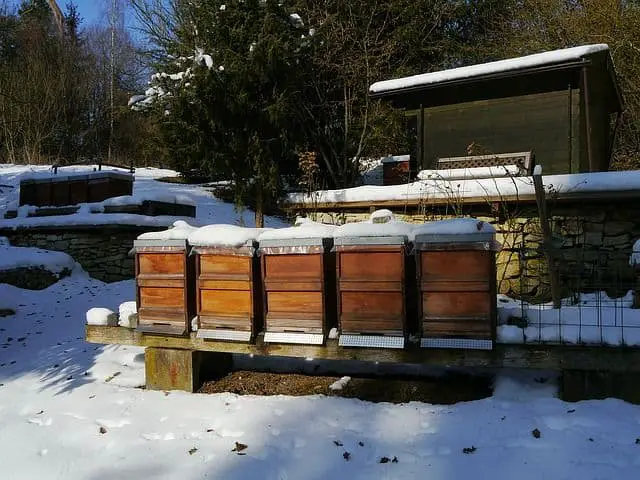
Like all other creatures on earth, honeybees have their own special way of coping with cold weather. They gather a winter reserve of honey and cluster together to stay warm.
When the temperature is below 50, they cluster in the middle of the hive and form what is generally called a “winter cluster.” This is just like you would see in football games — except the huddle lasts all winter!
Table of Contents
How to Winterize a Beehive in Northern Climates
Northern climates are extremely cold and raising bees during the winter season will require an understanding of how bees live and work under cold conditions.
Firstly, a prerequisite to preparing your hive is to actually have a high-quality beehive!
Without a good quality hive, you’re essentially putting your colony at a disadvantage, to begin with. Therefore, if you’re considering investing in a new beehive, here are our recommended bee hives for sale.
With that being said, here’s a guide on how to winterize a beehive and give your bees a better chance of survival.
- Prepare them before winter
Begin winter preparations early, and start winterizing the bee hive before it gets too cold.
During the winter, bees depend totally on the food that they have stockpiled in the autumn. Beekeepers who harvest all the honey from the colony usually give their bees high-fructose corn syrup.
Supplemental feeding with sugar syrup will ensure that your bees have what’s necessary to thrive during harsh cold weather. Use a 2:1 mixture of granulated sugar and water before wrapping the beehive. Don’t encourage robbing as this can deplete the hives food.
- Leave enough honey in the hive
We all know that for a colony to survive winter, it has to be large enough to keep itself warm and must have sufficient food to keep the hive in good shape.
Bees tend to eat more during the winter in order to generate more energy. They eat and use the energy to stay warm and eat again… the cycle goes on. In some cold regions, bees can eat as much as 90 lbs of honey over the winter. So when winterizing beehives, you must ensure that you leave enough feed to help them along.
It is better to leave too much food than too little. Estimate what they typically consume and leave more than enough to see them through. Leave extra food if possible, but not in the supers on top. If you do leave some food there, take off the queen excluder so that the queen can move up into the top super with her workers when it gets cold below.
A generous food supply will definitely encourage the queen to reproduce. Beekeepers are advised to continue feeding in early spring so that there is no disruption in providing nutrition for the new brood. You can stop feeding once pollen and nectar are naturally available and plentiful again.
- Place the honey close to the cluster
If you’ve ever inspected a hive that failed in the winter despite the abundance of food you’ll discover that the location of the food may have been too far from the cluster.
When bees come together to form a cluster, they move as a cluster, which means they don’t move around too much. Food that is too far away will simply be ignored. Once the queen starts to reproduce around January, the cluster stays close to the brood in order to keep it warm. The bees will not sacrifice the safety of the brood in order to feed. And this behavior has caused many hives to fail.
In order to help our bees survive and thrive, we need to understand this behavior. When you inspect the beehive in winter and notice that the cluster is running low on food, move some frames of honey closer to the cluster to make sure they can access it.
During this period, food that is just a few inches away is already considered too far. Food has to be within reach of the cluster or it is useless, making this a crucial step in winterizing a beehive.
- Wrap your hive
Some beekeepers believe that wrapping a beehive is a bad idea. They maintain that wrapping may cause the hive to be too hot and this warmness will mean that the bees are more active. When bees are active during winter, they will use up their stores more quickly. This debate has been going on for a long time, but I have never had this problem and always wrap my hives to keep the bees warm and comfy.
Besides, this argument won’t exist if you provide more than enough food in your beehives. I will leave it to you to decide if wrapping your hive appeals to you. But here’s a summary of how to keep your hive insulated during winter.
- Asses the colony in September to see if you have a strong queen, honey stores of about 75-95 pounds, and a large bee population.
- Extra holes in the bottom boxes should be closed and holes should be created in the top box.
- Place an entrance reducer with a small gap.
- By mid-October, wrap the beehive using a foam sheet. This is preferable to tar paper as it will not produce much heat on the odd warm days. It will absorb the moisture from the hive and evaporate to the outside.
- Cut out a hole in the foam sheet in the same location as the top entrance hole. Your hive is now ready for winter.
Insulating under the roof is necessary if you want to keep condensed water from dripping onto the cluster. This is one of the benefits of wrapping the hive. Generally, a wrapped hive has warmer walls and ceilings, so condensation will not form.
- Ventilate the hive
The first instinct many beekeepers have is to keep their beehives completely closed during the winter months. But knowing how to winterize a beehive in northern climates is to first acknowledge that you’ve gone too far when you over-insulate. One of the dangers of poor winter ventilation is Nosema or bee dysentery.
The fungal organisms responsible for these conditions thrive in wet and cold weather. You want to avoid moisture condensation by keeping the beehive dry and well-ventilated during the winter.
Why should you care about airflow in the winter? Because the bees keep the temperature of their “huddle” at about 90 degrees Fahrenheit. That causes condensation at the top of the hive cover. And that condensation can drip back down on the bees, causing other problems. So you want the air to be able to get *out* of the top of the hive.
So whatever you do, let the top of your hive breathe, and don’t wrap up the top or the bottom completely (just the sides).
Some hives will benefit with just one ventilation hole at the bottom of the hive, while others require cross-ventilation – a gap at the top and bottom. Also, carefully setting the entrance reducer to have a small gap will allow ventilation and give the bees access to the outdoors during the winter.
We hope that this clears up any reasoning on why it’s important to ensure beehive ventilation in winter.
- Choose an ideal opening on the entrance reducer
As summer fades away, nectar sources reduce in number. This is time to create your entrance reducer and limit food robbing. Some beekeepers keep them on all year round, but one time of the year that it’s most needed is the winter season.
The entrance reducer decreases the area that has to be protected by the guard bees. This makes their job a whole lot easier and also makes it harder for hive robbers and other critters to get access to the hive. During the winter, you can use it in controlling ventilation and the temperature of the hive. It is up to you how much space you leave as all hives are different.
However, a narrow entrance provides more ventilation and provides the bees with ample space for movement.
- Protect the entrance from mice.
During the late fall, mice are one of your worst enemies. They look so innocent and small but can cause a lot of havoc in the beehive. You can use a 3/8-inch hardware cloth, 21-gauge, or “3-mesh” to cover the entrance of the hive. Some beekeepers use nails to make the entrance opening even smaller. This works well as bees can still come and go, while mice are totally barred from entering the hive.
- Control Varroa mites
When springtime arrives, beekeepers discover some dead bees from the winter due to Varroa mites. These insects multiply really fast killing many worker bees. Vigilance and thorough inspections can help you discover an infestation early.
Varroa mites are more in August and September and this is when the queens stop reproducing. Broods are what the Varroa mites feed on and when there are none, they’ll shift their attention to worker brood cells. Imagine the effect on the worker bee population? Simply put, this can be catastrophic for the whole colony in winter.
During winter, there is not much to do with the hives if you already did all the right things in late summer and fall. However, you still have to keep your sight on mites. Count for mites in sticky-board for about three days and treat them if necessary removing the chemical strip after six weeks.
Mites are copper in color and are about the size of a pinhead. They cling to adult bees and suck their blood. Female mites will reproduce in brood cells and in time, their offspring suck the blood of the developing bee.
Let The Changing Seasons Guide Your BeeKeeping Activities!
As you can see from the above guide on how to winterize a beehive, cold climates should be easy on most beehives. Just like your honeybees, you should be guided by the changing seasons.
In Spring
During the spring you should be inspecting your colony regularly in order to ensure that the queen is present and is laying eggs. Also, you need to check that there are no signs of diseases and that your colony has a food source available until they have access to the first nectar and pollen. You should provide your bees with medication in order to prevent diseases up until early June when you should stop so that it does not get into the honey.
In Summer
As summer arrives you will need to add more supers to hold your honey. You will need to ensure that your bees have plenty of room or there is a possibility that they may swarm. You should continue to monitor your hive (or hives) and add a further super as the center frames become full of honey. Once the frames are full of honey and half of the cells are covered with wax then it is time to remove the super and frames in order to extract your honey.
In the Fall
When fall arrives you will need to examine your colony to check that it is free of disease and that the queen is still viable. In order to ensure that the bees have enough food for the winter, you will need to feed them with sugar and water.
… And in Winter
During winter it is mainly a matter of checking your hive to make sure that there are not too many holes and repair as necessary. During the winter you should expect some of your bees to leave the colony and die.
Final Thoughts
One of the things you want to manage in winter beekeeping is brood production. Usually, the queen bee will start laying eggs again around January while inside the bee cluster. With the right conditions, she will continue to reproduce a strong brood that will put your colony at a strong position when spring comes around.
One key thing you need to remember is that the queen will only reproduce if she thinks there are sufficient resources to nourish both the existing colony and the new brood. With this in mind, it is your responsibility to ensure that this important condition is met.
During winter, you can choose the number of hives you would want for the next year and the number of bees to make a strong colony. If you notice that some colonies are weak after winter, it is okay to combine two colonies for a better chance of survival. This will mean getting rid of one of the queens, but it is better to have a surviving hive than none at all.
If you’re completely new to beekeeping, take a read of our in-depth resources to learn how to start beekeeping and how to start a beehive.
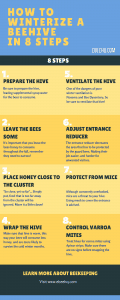
How to Winterize a Beehive in 8 Steps – Infographic
Steve's experience in beekeeping is extensive, having managed numerous hives and colonies of bees throughout his career. He is well-versed in all aspects of beekeeping, from hive management and bee behavior to honey production and bee health. Steve is also an advocate for sustainable beekeeping practices, using natural and organic methods to maintain healthy hives and protect the environment.
As a seasoned beekeeper, Steve has also shared his expertise with others by teaching workshops and classes on beekeeping. He is a sought-after speaker and has been invited to speak at conferences and events across the country.
With his wealth of knowledge and experience, Steve is a valuable resource for anyone interested in beekeeping. Whether you are a seasoned beekeeper or just starting out, Steve's insights and advice can help you become a successful and responsible beekeeper.