Last Updated: 24 July 2026
There’s been a lot of buzz lately about raising honey bees.
After all, who doesn’t like fresh honey?
However, we get a lot of questions from new/beginner beekeepers here at EbeeHQ, surrounding the topics of how to start a beehive and how to raise honey bees?
Therefore, we wanted to address the topic of how to raise honey bees within this article.
Firstly, compared with other types of animals, such as pigs, horses, chickens and sheep, you simply can’t beat the bee.
For one, they’re virtually self-sufficient and not high maintenance. There’s no need to worry about getting rid of a ton of bee manure or thawing their water when the temperatures become too cold even for Frosty the Snowman.
But there’s still a lot that goes into the care and keeping of bees. We’ve compiled a guide of everything you need to know about how to raise honey bees successfully.
So what are we waiting for, let’s get started!
Table of Contents
How to Raise Honey Bees: Select the Right Location
Location, location, location. It’s not just important in real estate. It’s also important for your honey-producing bees, which could soon become some of your most valuable assets.
First and foremost, your honey bees need sunshine, or if you have hot weather, they’ll need afternoon shade. They’ll also need easily accessible water near their hive. A bubble fountain that is shallow or even a big plant saucer will do the trick.
You’ll also need to choose a location where your beehive will receive protection from the wind. After all, wind may blow snow or rain into the beehive, thus decreasing the chance that the hive will remain warm.
Also, note that bees are private beings — they’re essentially the neighbours that really don’t want to be seen or bothered. So, don’t place their hive in an area with a lot of traffic. And avoid pet areas, swimming pools and play areas for this same reason.
Buying & Prepare Your Hives
It’s important to note that unlike a lot of other creatures, bees rely heavily on their hive, as it’s not only their source for shelter, but it contains their food source (honey).
Therefore, if you haven’t already got a beehive, I would suggest looking at our recommended beehives for sale, or if you’d prefer to get all of the beekeeping tools in one convenient set, take a look at our recommended beekeeping starter kits.
Once you’ve got the beehive set up, and after you’ve picked out the perfect location for your new companions, it’s time to start preparing it.
For instance, be sure to face your hive south if you can. And keep it off of the ground — you wouldn’t want critters and dampness to take their toll on your hive.
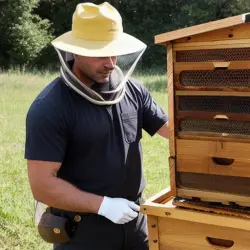
Now, it’s time to install your buzzing friends, but before that, put on your bee suit, we don’t want to get stung! Now, add them to your hive.
You may be asking, what’s the best season to do this in? And the answer is around Spring-time, as this is when growing flowers provide a helpful supply of food for your worker bees.
Bee Feeding
Speaking of food — yes, you can feed your honey bees. And yes, they deserve it.
Your busy bees are hard at work sealing seams and cracks in their home hive, as well as storing nectar and pollen. Plus, they’re busy tending to the queen bee as well as their new brood. In other words, they have their work cut out for them.
Why not give them a taste of nectar to make it easier for them to adjust to their new home? To create the nectar, you’ll want to mix equal parts water and granulated sugar. Then, add the sweet mixture to quart jars, and place feeder caps on top.
Next, invert your containers into the holes. You should see no drips from your lids; in fact, they shouldn’t be moist much at all. Your on-the-move colony will stop to drink to their hearts’ content from your jar lids.
After a while, you’ll lose your feeding job because your bees will begin to use flowers for their nutrition. And that’s not a bad thing — after all, if you keep giving your bees sugar water, the honey they end up producing will be insipid.
Translation: Your bees’ long-term consumption of your sweet treat will have a not-so-sweet outcome.
Hive Inspection
Just as it pays to keep an eye on your own home’s structure, you also need to inspect your bees’ home. Completing an inspection once per week for two months wouldn’t be a bad idea if you’re a novice in the beekeeping industry.
After you have grown more comfortable with your new role, an inspection every couple of weeks or so is sufficient.
So, what exactly do you need to be looking for?
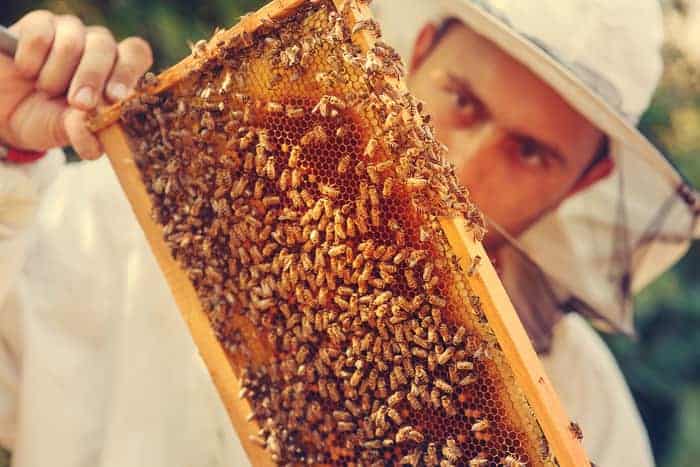
Make sure that the hive’s exterior stays clean and that no ants are crawling on your beehive. You’ll also want to open your hive and see if a large amount of larvae are present. If they are, that’s a good sign: It means your queen bee is healthy.
And that’s the most important thing for your entire colony.
But as time goes on, you really shouldn’t open the hive much. This process can stress out your bees, as you have to use smoke to calm them down. And unfortunately, it takes bees around one day to fully recover from this kind of stress.
Simply observing your bees while they go to and fro around the hive will likely tell you everything you need to know about your colony’s health.
Pest Inspection
Another part of your hive inspection involves looking for diseases and pests. The Varroa mite is among the most commonly found pests in beehives. If you don’t address it, these mites can easily cripple your hive and eventually destroy it.
Also, look out for wax moths and small hive beetles. Diseases to keep an eye out for include European and American foulbrood. The sooner you intervene, the greater your chances of having a thriving hive instead of a dead one.
Expansion
Just as some homeowners consider adding onto their homes, you may want to expand your beehive. Start with a deep brood box, where they may take up around seven to eight rows. Then, after your buzzing friends have filled up this box, add a second box on top.
With these boxes, building up solid brood cells is easy for your bees. Then, you can add what’s known as a queen excluder above it. The box at the very top — the cherry on top or the icing, if you will — is the honey super box, where you’ll collect the majority of the bees’ honey.
Enjoy the Fruits of Your Labor
Yes, the scrumptious taste of honey is reason enough to learn how to raise honey bees. And it’s probably the top reason you’d shout, “Bees, please!”
But there are other benefits to becoming a top-notch beekeeper. For instance, bees produce wax, which can come in handy for cosmetics and candles. Just think: you could create your very own lip balm.
Also, by mastering how to raise honey bees, you promote pollination. In fact, bees pollinate around $15 billion worth of crops each year.
How We Can Help
We offer plenty of information on how to raise honey bees properly whether you’re a novice or expert in your own right.
Spend more time on our site to find out more about how you can maximize your beekeeping results with proven best practices, technologies and techniques time and time again.
Steve's experience in beekeeping is extensive, having managed numerous hives and colonies of bees throughout his career. He is well-versed in all aspects of beekeeping, from hive management and bee behavior to honey production and bee health. Steve is also an advocate for sustainable beekeeping practices, using natural and organic methods to maintain healthy hives and protect the environment.
As a seasoned beekeeper, Steve has also shared his expertise with others by teaching workshops and classes on beekeeping. He is a sought-after speaker and has been invited to speak at conferences and events across the country.
With his wealth of knowledge and experience, Steve is a valuable resource for anyone interested in beekeeping. Whether you are a seasoned beekeeper or just starting out, Steve's insights and advice can help you become a successful and responsible beekeeper.