Are you a beginner beekeeper looking to release your first batch of bees into your hive? Or perhaps you’ve been keeping bees for a while, but you’re still unsure about the best way to release them into their new home.
Whatever your level of experience, releasing bees into a hive can be an exciting yet nerve-wracking experience. But fear not! With a little preparation and some basic know-how, you’ll be able to release your bees into their new home with confidence and ease.
In this article, we’ll guide you through the process of preparing your hive for bee release, getting your bees ready for release, choosing the best time to release your bees, and, most importantly, how to release your bees into your hive.
We’ll also provide some tips for monitoring your bees and hive after the release to ensure that your bees settle in and thrive in their new home.
So, grab your bee suit, smoker, and hive tool, and let’s get started!
Table of Contents
Key Takeaways
- Choose a suitable location for the hive with access to nectar and pollen, protection from predators, and mild weather conditions.
- Acclimate bees to their new surroundings by spraying them with sugar water and allowing them to settle in for a few hours.
- Properly introduce bees to their new home by ensuring the queen bee is healthy and present, keeping her in her own cage for a few days, and placing the queen cage near the center of the hive.
- Regularly monitor the hive for signs of disease, pests, or other issues affecting the bees and take action if necessary to prevent significant problems.
Preparing Your Hive for Bee Release
Now that you’ve got your hive set up, it’s time to prepare it for the arrival of your buzzing friends. First, you’ll need to select your queen bee. This is an important step as she will be the heart of your colony and will lay all the eggs. Make sure you choose a strong, healthy queen bee with a good temperament. You can either purchase a queen bee or let the bees in your package select their own queen.
Next, you’ll need to choose the perfect spot for your hive. It should be placed in a sunny location with some shade during the hottest part of the day. The hive should also be sheltered from strong winds and rain. Make sure there’s plenty of room for the bees to fly in and out of the hive.
Once you’ve selected the perfect spot, it’s time to move on to getting your bees ready for release.
Getting Your Bees Ready for Release
First, you’ll need to prepare your hive for the arrival of your new buzzing friends. Once your hive is ready, it’s time to get your bees ready for release. Here are some things to keep in mind:
-
Choosing Bee Species: Before you release your bees, make sure you’ve chosen the right species for your region. Some species are better adapted to certain climates and environments than others, so do your research to find the best fit for your area.
-
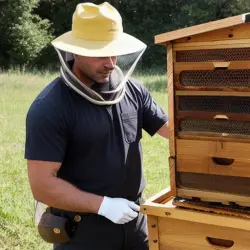
Beekeeping Equipment: You’ll need some essential beekeeping equipment before you release your bees. This includes a bee suit, gloves, smoker, and hive tool. Make sure you have everything you need before you start the release process.
-
Preparing the Bees: When you receive your bees, they will likely be in a package or a nuc box. Before you release them into the hive, you’ll need to acclimate them to their new surroundings. This involves spraying them with sugar water and allowing them to settle for a few hours before releasing them into the hive.
Now that your bees and hive are ready, it’s time to determine the best time to release your bees.
The Best Time to Release Bees
When it comes to releasing your buzzing friends, you’ll want to choose the right time to ensure they can thrive like flowers in the sunshine. Choosing the right location and considering the weather are two important factors to keep in mind.
The location should be near a source of nectar and pollen, away from predators and direct sunlight. You should also choose a day when the weather is mild and sunny, with little to no wind.
The ideal temperature to release bees into your hive is around 60-70°F. If it’s too hot, the bees may become agitated and more prone to swarming. If it’s too cold, they may struggle to establish their colony and may not survive the winter.
Once you’ve chosen the right location and weather conditions, it’s time to release your bees!
How to Release Bees into Your Hive
One important step to ensure the success of your bee colony is to properly introduce them to their new home. Begin by checking that your queen is present and healthy before releasing the bees. It’s a good idea to keep her in her own cage for a few days to allow the bees to become familiar with her scent, but make sure to remove the candy plug from the cage to allow the bees to release her when they’re ready.
Next, prepare your beekeeping equipment by making sure your hive is properly set up and ready for the bees. Open the entrance to the hive and gently shake the bees out of their package into the hive. Be careful not to shake them too hard, as this can cause damage to the bees.
Once all the bees are in the hive, place the queen cage near the center of the hive and wait a few days before removing it. This will give the bees time to accept the queen as their leader and begin to build their colony.
After the release, monitoring your bees and hive is an important step to ensure the health and productivity of your colony. Keep an eye on the activity of the bees and make sure they have enough food and water. Regularly inspect the hive for signs of disease or infestation and take action if necessary.
By properly introducing your bees to their new home and monitoring their activity, you can help ensure the success of your beekeeping endeavor.
After the Release: Monitoring Your Bees and Hive
Keeping a close eye on your bee colony is crucial after they have settled into their new home. As the saying goes, "an ounce of prevention is worth a pound of cure." One of the most important things to monitor is the behavior of the queen bee. The queen is the heart of the hive and is responsible for laying eggs and maintaining the colony’s cohesion. You want to make sure that she is laying eggs regularly and that the workers are tending to her needs. If she becomes sick or dies, the colony could collapse.
Another essential task is regular hive inspections. These inspections allow you to check for signs of disease, pests, or other issues that may be affecting your hive. During an inspection, you will look for things like the amount of honey and pollen stored, the number of bees present, the condition of the comb, and the overall health of the colony. By monitoring your bees and hive, you can catch problems early and take steps to prevent them from becoming more significant issues. With proper care and attention, your bees can thrive and provide you with delicious honey and help pollinate your garden.
| Queen Bee Behavior | Hive Inspection | ||
|---|---|---|---|
| Regularly check on the queen’s health | Check for signs of disease and pests | ||
| Make sure the workers are tending to her needs | Look for the amount of honey and pollen stored | ||
| Catch any issues early | Check the condition of the comb | ||
| Prevent problems from becoming significant issues | Check the overall health of the colony | Ensure the queen is laying eggs and that the brood pattern is healthy. |
Frequently Asked Questions
How do I know if my hive location is suitable for releasing bees?
To ensure your hive location is suitable for bees, consider the importance of bee diversity and benefits of providing food sources. Look for areas with a variety of flowering plants and avoid areas with pesticides.
What should I do if I accidentally drop a bee during the release process?
If you drop a bee during release, don’t panic. "Don’t cry over spilled milk." Use a gentle touch to place it back in the hive. Handling mishaps, preventing harm: Tips for bee release. Importance of proper bee handling during the release process.
Can I release bees at night or in cooler temperatures?
Releasing bees in cooler temperatures or at night can be dangerous as they may not be able to navigate and acclimate properly. It’s best to release them during the day in mild weather for a successful integration into the hive.
How long should I wait before checking on my bees after the release?
After releasing your bees, wait a few days before checking on them. Frequent checking can disturb the bees and disrupt their behavior. Bees take time to establish their colony, so patience is key.
What should I do if I notice a decline in bee population after the release?
If you notice a decline in bee population after release, don’t panic. Possible discussion ideas: Bee population decline prevention, Bee release best practices. Check for disease or mites, ensure a healthy environment, and source bees from reputable providers.
Conclusion
Congratulations! You’ve successfully released your bees into their new hive. These little creatures are an essential part of our ecosystem, so it’s important to take good care of them.
You’ve taken the first step towards becoming a responsible beekeeper, and you should be proud of yourself.
The next step is to monitor your bees and hive closely to ensure they’re thriving. Be patient and give your bees time to settle into their new home.
With a little bit of care and attention, your bees will soon be buzzing around happily, collecting nectar and pollen, and producing delicious honey for you to enjoy.
Happy beekeeping!
Steve's experience in beekeeping is extensive, having managed numerous hives and colonies of bees throughout his career. He is well-versed in all aspects of beekeeping, from hive management and bee behavior to honey production and bee health. Steve is also an advocate for sustainable beekeeping practices, using natural and organic methods to maintain healthy hives and protect the environment.
As a seasoned beekeeper, Steve has also shared his expertise with others by teaching workshops and classes on beekeeping. He is a sought-after speaker and has been invited to speak at conferences and events across the country.
With his wealth of knowledge and experience, Steve is a valuable resource for anyone interested in beekeeping. Whether you are a seasoned beekeeper or just starting out, Steve's insights and advice can help you become a successful and responsible beekeeper.