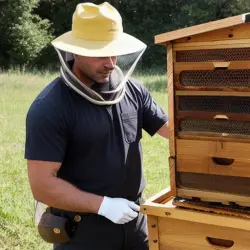
As a beekeeper, you know the importance of a strong and healthy queen bee to the success of your hive. However, over time, your queen may become less productive, aggressive, or even die, leaving your colony in need of a new queen. Re-queening your beehive is a delicate process that requires careful planning and execution to ensure the well-being of your bees.
Imagine a bustling hive filled with thousands of bees working tirelessly to produce honey and care for their queen. The queen, the heart of the colony, lays eggs and maintains the hive’s population. But what happens when the queen is no longer able to fulfill her duties and the health of the colony is at risk? That’s where re-queening comes in.
In this article, we’ll guide you through the process of selecting the right queen bee, preparing your colony, introducing the new queen, and monitoring your hive after re-queening. With the right tools and knowledge, you can maintain a healthy and thriving beehive for years to come.
Table of Contents
Key Takeaways
- Re-queening is important for the success of a beehive, and signs of a failing queen include decreased egg-laying and a weaker colony.
- Selecting the right queen bee involves considering genetics, age, and source, and preparation for re-queening requires ensuring queenlessness, no aggression or disease, and removing queen cells.
- Introducing the new queen should be done slowly and carefully using a queen cage, and the hive should be monitored closely for queen acceptance and egg-laying.
- Re-queening can lead to increased honey production and a more productive colony, but it is a delicate process that requires careful planning and execution, along with necessary beekeeper equipment for protection in a queenless hive.
Reasons for Re-queening Your Beehive
You’ll want to re-queen your beehive if she’s not laying enough eggs, making your colony weak and vulnerable to disease and predators. The benefits of re-queening your hive include increased honey production, stronger and healthier bees, and a more productive colony.
Signs of a failing queen can include a decrease in egg-laying, spotty brood pattern, and a generally weaker colony. It’s important to keep an eye on your queen and replace her when necessary to ensure the longevity and success of your hive.
Once you’ve determined that re-queening is necessary, the next step is selecting the right queen bee to introduce to your colony.
Selecting the Right Queen Bee
Picking the right queen bee for your hive is crucial for successful re-queening. When selecting a queen bee, there are a few factors to keep in mind:
- It’s important to choose a queen bee with desirable genetics for your specific beekeeping goals. For example, if you want your hive to produce a lot of honey, you may want to select a queen bee with strong honey production genetics.
- A young queen bee is typically better for re-queening because she is more likely to be accepted by the worker bees in the hive.
- Choose a reputable source for your queen bee to ensure that she is healthy and well-mated. You can find queen bees for sale at beekeeping supply stores or from local beekeepers.
Once you have selected the appropriate queen bee, it’s time to prepare your colony for re-queening.
Preparing Your Colony for Re-queening
Before bringing in the new queen, it’s essential to ensure that the current queen has left the hive with all her followers. The colony needs to be queenless like a deserted island waiting for a savior to bring them back to life.
A queenless hive is usually more defensive, so make sure you have the necessary beekeeper equipment to protect yourself. It’s also important to check for any signs of aggression or disease, as these can be passed on to the new queen.
Once you’re sure the hive is queenless and ready for a new monarch, you can start preparing for the arrival of the new queen. This involves removing any queen cells that may have formed in the existing colony, as these can compete with the new queen and cause problems.
With the old queen removed and the hive queenless, you’re now ready to introduce the new queen to your hive.
Introducing the New Queen to Your Hive
Now that the hive is queenless and ready, it’s time to introduce the new queen to her new subjects. Queen acceptance is crucial in this process as it determines whether or not the hive will accept her and allow her to lay eggs.
To ensure this, it’s important to introduce the queen slowly and carefully to the hive. One way to do this is by using a queen cage. Place the new queen inside the cage and hang it inside the hive for a few days. This allows the bees to get used to her scent and presence without being able to harm her.
During this time, the bees will begin to exhibit specific hive behavior, such as fanning their wings and spreading the queen’s pheromones throughout the hive. Once the bees have accepted her, you can release the queen from the cage and allow her to take over the hive.
Remember to monitor the hive closely during this time to ensure that the queen is laying eggs and the hive is thriving.
With the queen successfully introduced to the hive, it’s important to monitor her progress and make sure that the hive is adjusting well to the new queen’s presence.
Monitoring Your Hive After Re-queening
After introducing the new queen, it’s like watching a seed grow into a flower as you monitor the hive’s progress and ensure that the queen is laying eggs and the hive is thriving.
The first thing to observe is the queen’s behavior. A queen that has been accepted by the colony will start laying eggs within a few days. You can check for her presence by looking for eggs, larvae, and capped brood in the comb cells. If the queen is not laying eggs or there are no signs of brood after a week, then it may be a sign of queen failure and you may need to re-queen again.
The colony’s response to the new queen is also important to monitor. You may notice a change in worker behavior, such as increased activity and a more organized work flow. If the colony is accepting the new queen, you will also see a decrease in queen cells being built by the worker bees.
However, if the workers continue to build queen cells, it may be a sign of queen rejection and you may need to intervene to prevent the colony from swarming. Monitoring the hive after re-queening is crucial to ensure the success and stability of the colony.
Frequently Asked Questions
How long does it take for a new queen bee to start laying eggs after being introduced to the hive?
After being introduced to the hive, it usually takes around 3-5 days for the new queen bee to be accepted by the colony. Once accepted, she will begin laying eggs within a few days if feeding protocols are followed correctly.
Can you re-queen a hive during the winter months?
Winter is a time of rest for beehives, but re-queening is feasible if done correctly. A new queen can improve hive productivity, laying eggs within a week. Consider the benefits carefully before attempting.
Is it necessary to remove the old queen before introducing the new queen bee?
To improve hive productivity, it’s important to consider genetic diversity when re-queening. It’s recommended to remove the old queen before introducing the new one to avoid conflict and ensure a smooth transition.
What is the success rate of re-queening a hive?
Timing is crucial when re-queening a hive, as the success rate can vary. Research suggests introducing a new queen during a nectar flow can increase success rates. However, individual factors such as colony health and temperament can also impact success.
How often should you re-queen your beehive?
To ensure a healthy and productive hive, you should re-queen your beehive every 1-2 years. Look for signs of a failing queen, such as reduced brood production or aggression, and prioritize genetics for a strong colony.
Conclusion
Congratulations! You’ve successfully re-queened your beehive. Your efforts will pay off in the long run as the new queen bee will ensure a healthy and productive hive.
Re-queening is necessary when you notice a decline in your colony’s productivity or behavior. It’s important to choose the right queen bee and prepare your colony for her arrival. Introducing the new queen can be a delicate process, but with patience and proper monitoring, your hive will welcome their new leader.
Now sit back and watch your hive thrive under the guidance of their new queen. You’re a skilled beekeeper, and your dedication to your bees will surely yield sweet rewards. In fact, you may even have the best honey in the land – okay, maybe that’s a bit of a hyperbole, but you get the point.
Keep up the good work, and your bees will thank you!
Steve's experience in beekeeping is extensive, having managed numerous hives and colonies of bees throughout his career. He is well-versed in all aspects of beekeeping, from hive management and bee behavior to honey production and bee health. Steve is also an advocate for sustainable beekeeping practices, using natural and organic methods to maintain healthy hives and protect the environment.
As a seasoned beekeeper, Steve has also shared his expertise with others by teaching workshops and classes on beekeeping. He is a sought-after speaker and has been invited to speak at conferences and events across the country.
With his wealth of knowledge and experience, Steve is a valuable resource for anyone interested in beekeeping. Whether you are a seasoned beekeeper or just starting out, Steve's insights and advice can help you become a successful and responsible beekeeper.